


DTF (Direct-to-Film) printing’s speed, versatility, and cleanliness have revolutionized small enterprises, custom goods companies, and artists, making this direct-to-film printing method widely popular. But if pressed incorrectly, even the most excellent DTF transfers that utilize quality DTF ink can fail.
Master Heat Pressing for Flawless DTF Prints
Issues like cracking, peeling, or uneven prints are usually caused by improper heat pressing rather than the film itself. Knowing how to heat-press DTF transfers correctly using a DTF printer and applying DTF transfers is essential. This guide covers everything from setup to final peel, helping you produce sharp, durable prints that impress clients and withstand washing, no matter your experience level.
Introduction to DTF Transfers
DTF transfers, or direct-to-film transfers, are popular for creating custom apparel and promotional products, particularly among those looking for unique DTF transfers. This innovative technique involves printing designs onto a special transfer film, which is then applied to a substrate such as a t-shirt, tote bag, or hat.
Create Pro-Level Prints with DTF Transfers
DTF transfers offer high-quality, vibrant prints with excellent print quality and color accuracy, making them a great choice for businesses and individuals looking to create unique and professional-looking products.
With the right equipment and knowledge, anyone can create their own DTF transfers and achieve professional results. Whether a small business owner or a DIY enthusiast, DTF transfers provide a versatile and efficient way to bring your creative ideas to life.
Understanding DTF Printing
DTF printing is a type of printing process that involves printing directly onto a film, eliminating the need for intermediate steps. This process is cost-effective and efficient, especially when using high-quality DTF ink, making it an excellent choice for small businesses and DIY enthusiasts.
Vibrant Prints Made Easy
DTF printing uses a special type of ink designed to adhere well to fabric, complemented by DTF powder. This results in bright, vivid colors and fine details. To achieve optimal results, it’s essential to understand the basics of DTF printing, including the type of film and ink used and the heat press process.
By mastering these elements, you can ensure that your DTF prints or UV DTF prints are of the highest quality, with unmatched durability and color vibrancy.
Why Proper Pressing Matters in DTF Printing?
You printed your fantastic design on premium DTF film, showcasing your creations. Applying the transfer appropriately is the next vital step to ensure the design remains intact. Applying the transfer correctly ensures your design adheres perfectly, looks vibrant, and lasts long on the final product, such as a T-shirt.
Here’s what pressing does, as detailed in this step-by-step guide :
- Activates the adhesive on the transfer film
- Bonds the design to your fabric
- Ensures durability across multiple washes
If you use the wrong temperature and pressure or don’t take specific precautions, like pre-pressing, your crafting technology could fail, ruining your work in seconds. You will not get the desired outcome if you bake a cake perfectly but forget to change the oven settings, just like not removing excess powder from the fabric.
What You’ll Need
Let’s prepare your workspace for pressing DTF transfers like a pro. Gather all necessary tools and equipment, ensure a clean, organized area, and double-check your heat press settings to achieve the best results with precision and efficiency.
- A heat press (not an iron, consistency matters!)
- Your printed DTF transfer
- A clean, dry garment (cotton, polyester, blends all work well)
- Parchment paper or a Teflon sheet
- Lint roller (optional but helpful)
- Heat-resistant gloves (if you’re working with volume or thicker materials)
- A curing oven (highly recommended for properly curing the adhesive on transfers, capturing harmful fumes, and speeding up curing time)
Designing for DTF Transfers
Designing for DTF transfers requires knowledge of graphic design software, screen printing techniques, and printing. When creating designs for DTF transfers, it’s essential to consider the color palette, font style, and image resolution.
DTF Transfer Design Tips
For sharp, fine details in prints, a high-resolution image with a minimum of 300 DPI is recommended. Additionally, the design should be mirrored before printing, especially if it includes text.
By following these guidelines and using the right software, anyone can create high-quality designs for DTF transfers. This attention to detail ensures that your designs remain intact and look professional once transferred onto the fabric.
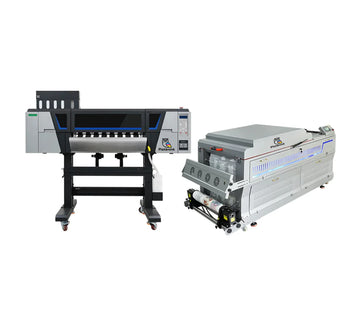
Printing DTF Transfers
Printing DTF transfers involves several steps, including loading the film into the printer, printing the design, and applying the adhesive powder. The printer used for DTF transfers is typically an inkjet printer equipped with high-quality pigment inks for best adhesion and color vibrancy.
DTF Transfer Film
The film used for DTF transfers is a special type of film designed for printing, and it’s available in various sizes and types. Following the manufacturer’s instructions for the printer and film is essential to achieve professional results. This ensures that your printed designs are of the highest quality and ready for the next step in the transfer process.
Applying Adhesive Powder
Adhesive powder application is a crucial step in the DTF transfer process. The powder is applied to the printed design while the ink is still wet, and it helps the design adhere to the fabric. The type of powder used for DTF transfers is a hot-melt DTF powder, known as powder adhesive, which is designed to melt and adhere to the fabric when heat is applied.
Using Powder Right
To apply the powder correctly, it is essential to follow the manufacturer’s instructions and use the right amount of powder. Excess powder can be removed using a gentle shaking motion, and the design should be allowed to cool before handling. This step ensures that your DTF transfers have a strong, durable bond with the fabric, resulting in lasting professional results.
Step-by-Step: How to Heat Press DTF Transfers
This step-by-step guide covers the detailed press instructions for DTF transfers. Remember that these apply to most DTF transfers, particularly those from reputable companies like Bostonian DTF, which are known for their excellent quality.
Step 1: Pre-Press Your Garment
Put your blank garment on the heat press to start. To ensure a smooth surface for improved adhesion during the transfer process, use a heat source to close the press for 5 to 10 seconds without any transfer to eliminate moisture and wrinkles.
Why this matters
- Removes trapped moisture
- Smooths out wrinkles
- Prepares the fabric for better adhesive bonding
This one small step prevents issues like bubbling or uneven transfer.
Step 2: Position the Transfer
Lay the DTF transfer on your garment with the design facing up (film side up) and ensure it is loaded correctly. Align it for a moment; crooked or off-center prints are challenging to hide and even more challenging to correct.
Slick or flexible materials might have their edges secured with heat-resistant tape to keep them from moving.
Step 3: Cover with Parchment or Teflon
Before pressing, cover your transfer with a Teflon sheet, parchment paper, or a pressing cloth. This helps provide uniform pressure throughout the surface and safeguards your press and garment.
Using a transfer with a Teflon sheet is a common technique because it disperses heat uniformly and reduces burning.
Step 4: Set Your Heat Press
Set your heat press to the correct temperature and pressure to ensure bright colors in your DTF print and optimal results, particularly when using white ink. Proper settings are essential for a smooth, durable transfer, ensuring the design adheres perfectly without damage or peeling. Adjust carefully based on your fabric and transfer specifications.
Ideal settings for DTF:
- Temperature: 300°F to 320°F (149°C to 160°C)
- Time: 10 to 15 seconds
- Pressure: Medium to firm
Medium pressure guarantees the adhesive melts and forms a strong bond without overpressurizing the fabric. Use a pressing pillow or change the height to achieve even pressure on heavier materials or seams.
Step 5: Peel It Right
After the press time ends, be patient. Knowing the right moment and method to peel the transfer is crucial to avoid damage and ensure a perfect, lasting design, especially on dark colors. Bostonian DTF transfers work best with a cold peel method. This means:
- Wait until the film cools down completely
- Gently peel from one corner in a smooth, slow motion
Peeling too early can lift parts of the design or cause cracking. If any area doesn’t stick fully, place parchment back over it and re-press for 5 seconds.
Step 6: Post-Press for Added Durability
For maximum strength and a clean finish, always perform a quick post-press, as this process can be a game-changer to create vibrant designs. This final heat application helps secure the design firmly, smooths out imperfections, and enhances durability, ensuring your transfer looks professional and lasts through multiple washes.
Here’s how:
- Place parchment or Teflon over the peeled design
- Press again for 5–7 seconds
- Use the same temperature, with medium pressure
This step seals the ink, smooths the finish, and gives your print extra resistance against washing and wear.
Common Mistakes to Avoid
Even experienced DTF users sometimes make these mistakes, especially if they don't know how to print DTF transfers correctly. Here are some key points to consider:
- Skipping pre-press: Moisture and wrinkles can ruin adhesion.
- Using the wrong peel method: If your film is cold, don’t hot peel it.
- Not using a protective sheet: Can burn or unevenly press your transfer.
- Incorrect pressure settings: Too much or too little can lead to problems.
- No post-press: Skipping this step can shorten the life of your print.
- Avoiding these pitfalls can dramatically improve your finished products.
Caring for DTF-Printed Garments
Customers or your staff should be instructed on properly washing and caring for a freshly pressed T-shirt or sweatshirt made with high-quality DTF transfers on various fabric types.
Aftercare tips
- Wait 24–48 hours before the first wash
- Wash inside out in cold water
- Avoid bleach or harsh detergents
- Tumble dry low or air dry
- Avoid ironing directly on the design
When pressed correctly and cared for properly, DTF transfers, especially those using DTF direct-to-film techniques, with the right DTF ink and DTF powder, can last 50+ washes without cracking or fading.
Why Bostonian DTF Transfers Make It Easier?
Not all DTF transfers are created equal. Bostonian DTF is designed to deliver unmatched quality, making the pressing process smoother and more reliable.
Here’s what sets us apart
In this innovative printing technique :
- Perfect cold-peel formula for clean finishes
- Compatible with cotton, poly, blends, and more
- Pre-cured for consistent results
- Works with all major heat presses
If you’re tired of second-guessing your press or troubleshooting cheap transfer sheets, you’ll love how Bostonian DTF helps you create confidently.
Check out our latest transfer options and helpful guides: How to Heat Press DTF Transfers.
Wrapping it Up
Mastering how to heat press DTF transfers and understanding DTF transfer printing isn’t just about following numbers but building a rhythm. Pre-press the fabric. Set your temperature and pressure just right.
Flawless Finishing
Peel when cool, post-press for protection. These steps will elevate your print game, reduce waste, and impress your customers with quality and consistency. As more businesses and creators move to DTF for its color vibrancy and versatility, especially with an inkjet printer, knowing how to get the press process right puts you ahead of the curve.
Need more help?
Contact the Bostonian DTF team today. We’re happy to guide you with detailed press instructions, product recommendations, or custom DTF transfer solutions.
Additionally, we may include other affiliate links in our recommendations, which means we could earn a commission if you purchase through those links.


