


Halloween is the season of creativity, when everyone loves showing off custom shirts, hoodies, and tote bags. Whether you’re printing for friends, selling at a fair, or prepping your own outfit. Halloween DTF transfers are the easiest way to get bright, long lasting designs.
But here’s the thing: even the best transfers can fail if not applied the right way. That’s why knowing how to apply DTF transfers correctly makes all the difference.
In this simple holiday DTF transfer application guide, we’ll walk you through each step, from prepping your fabric to peeling the film, so your Halloween prints come out bold, durable, and professional.
Step 1: Get Your Fabric Ready
Before pressing, you need good fabric prep for DTF application. A clean, smooth surface helps your transfer stick perfectly.
-
Wash the garment to remove dirt or oils.
-
Avoid using softeners, they can reduce adhesion.
-
Use a lint roller to clean off dust or fibers.
-
Always pre-press garment before applying DTF for about 5 to 10 seconds to remove moisture and wrinkles.
This small step prevents bubbles and makes the final print look sharp.
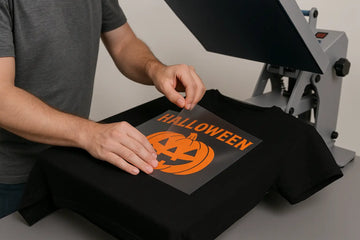
Step 2: Place Your Transfer
Lay your shirt or hoodie flat on the heat press. Center your Halloween DTF transfer on the garment. Measure twice to make sure it’s aligned before you press.
If you’re creating a Halloween shirt DTF transfer application, leave about two inches between the neckline and the top of the design. Once positioned, double check for any folds or seams under the plate.
Step 3: Adjust Heat Press Settings
Now it’s time to press! The right heat press settings for DTF Halloween prints are key to strong adhesion and bright colors.
Here’s the ideal setup:
-
Temperature: 300°F to 315°F (150°C to 157°C)
-
Pressure: Medium to firm
-
Time: 15 to 20 seconds
These DTF pressing settings for Halloween designs work best for cotton, polyester, and blends. Always test a small piece first if you’re unsure.
Step 4: Press the Transfer
Once your settings are ready, it’s time to apply the magic.
-
Cover the transfer with parchment paper or a Teflon sheet.
-
Close the press firmly.
-
Hold for 15 to 20 seconds under even pressure.
-
Lift slowly once done.
The combination of time, pressure, and temperature makes sure your print sticks firmly and the colors stay rich.
Step 5: Peel with Care
Now comes the moment of truth. After pressing, let the design cool for a few seconds. Most DTF transfer application instructions suggest a warm peel, not hot and not cold.
Peel slowly at an angle. If part of the print lifts, press again for 5 seconds and peel once more. For Halloween shirt DTF transfer application, this step ensures every ghost, pumpkin, or skull detail stays perfect.
Step 6: Final Press for a Polished Look
To seal the design completely, do a quick repress:
-
Place parchment paper over the print.
-
Press again for 5 seconds at the same temperature.
This gives your design a soft, matte finish and helps it withstand multiple washes.
Step 7: Wash and Care Tips
Once your transfer is complete, proper care will help your print last.
-
Wait 24 hours before washing.
-
Wash inside out in cold water.
-
Avoid bleach and high heat drying.
These tips protect the bond created during pressing and keep your Halloween designs bright for seasons to come.
Common Mistakes to Avoid
Even pros can make small mistakes. Here’s what to watch out for:
-
Skipping prepressing: Moisture ruins adhesion.
-
Using wrong pressure: Too light and the film won’t bond.
-
Peeling too soon: Always wait a few seconds before peeling.
-
Ignoring garment type: Check DTF pressing settings for Halloween designs depending on the fabric.
Careful handling and the right DTF transfer application instructions can turn any beginner into a pro.
Conclusion
Now that you know how to apply DTF transfers, you’re ready to create vibrant Halloween shirts, hoodies, and more. From fabric prep to perfect peeling, every step matters.
Using the correct heat press settings for DTF Halloween prints and following this apply DTF transfer step by step guide will give you bright, detailed designs that last long after Halloween night.
Ready to get started? Visit Bostonian DTF to shop high quality Halloween DTF transfers and create your spooky designs with confidence!
FAQs
1. What temperature should I use when applying DTF transfers?
For DTF Halloween prints, the best heat press settings are 300°F to 315°F for 15–20 seconds with medium–firm pressure. Prior to pressing the complete design, always test.
2. How should I prepare my fabric before applying DTF transfers?
Start with proper fabric prep for DTF application. Make sure the fabric is clean, dry, and lint free. Always pre-press garment before applying DTF to remove wrinkles and moisture.
3. Can I use DTF transfers on any type of garment?
Yes! You can use DTF transfers on cotton, blends, and even dark fabrics. Just follow the correct DTF transfer application instructions for your material.
4. How do I know if my transfer has stuck properly?
If your print feels flat and smooth after peeling, it’s perfect. If edges lift, re press for a few seconds. Follow the holiday DTF transfer application guide for best results.
5. How long do DTF Halloween prints last?
Your Halloween DTF transfers will not fade or crack after more than 50 washes if you wash and care for them gently. Don't use high heat to keep them looking brand new.


